As a lover of fresh herbs, I always feel a tinge of sadness as summer comes to an end and my herb garden begins to wither away. But, over the years, I’ve learned how to preserve the flavor of summer by drying and storing my fresh herbs. Not only does this allow me to enjoy my favorite herbs year-round, but it also saves money and reduces food waste.
Preserving fresh herbs is easy if you know what you’re doing. It’s important to choose the right herbs, harvest them at the right time, and use proper drying methods. In this article, I’ll share my tips and tricks for preserving the flavor of summer through drying and storing fresh herbs.
Whether you’re an experienced home cook or just starting out in your culinary adventures, these tips will help you make the most of your herb garden all year long.
Table of Contents
Choose the Right Herbs to Dry
When you’re looking to add some pizzazz to your meals, knowing which herbs are best for drying can help you keep your pantry stocked with fresh flavors all year round.
Herbs for drying include basil, oregano, thyme, rosemary, and sage. These herbs have a low moisture content and retain their flavor well when dried.
Drying herb techniques vary depending on the type of herb. For example, basil should be air-dried in a warm place with good airflow while thyme and rosemary can be hung upside down in a cool, dark place.
Regardless of the technique used, it’s important to ensure that the herbs are completely dry before storing them in an airtight container away from direct sunlight.
By choosing the right herbs for drying and using proper techniques, you can preserve the flavor of summer and enjoy fresh herbs all year long.
Harvest and Prepare Your Herbs
Get your herbs ready for long-term use by picking them at the right time and following these simple steps. Timing is everything when it comes to herb preservation techniques. You want to pick your herbs when they are at their peak flavor and aroma.
Before harvesting your herbs, make sure they’re dry and free of any dew or moisture. The best time to harvest is in the morning after the dew has dried but before the sun gets too hot. Cut your herbs back by about one-third of their height, being careful not to damage any surrounding leaves or stems.
Once harvested, give your herbs a good shake to remove any dirt or debris before proceeding with preservation techniques such as drying or freezing.
Drying Methods
I’ve found that air drying herbs is the easiest and most cost-effective method for preserving them. Simply tie a bundle of fresh herbs together with string and hang in a dry, well-ventilated area for several weeks until fully dried.
If you’re short on time, oven drying is a quicker alternative, but be sure to use low heat and keep an eye on the herbs to prevent burning.
Alternatively, using a dehydrator can also produce great results, especially if you plan on drying large quantities of herbs or other fruits and vegetables.
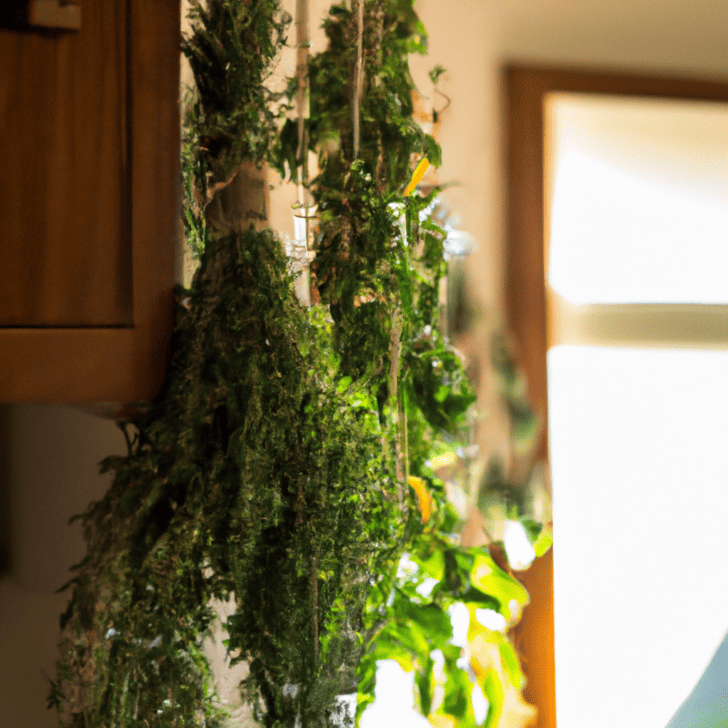
Air Drying
You can simply hang your herbs upside down and let the air do the work, resulting in perfectly dried and deliciously fragrant leaves that will make your taste buds dance with joy. Air drying is one of the oldest methods of preserving herbs, and it has many benefits over oven drying.
Here are some tips for successful air drying:
- Choose a warm, dry room with good air circulation.
- Tie small bunches of herbs together with twine or string and hang them upside down from a clothesline or rack.
- Be patient! It can take anywhere from several days to a few weeks for the herbs to dry completely.
Air drying allows the herbs to retain their natural oils and flavors, which can be lost during oven drying. Plus, it’s an easy and inexpensive method that requires no special equipment. Give it a try next time you have an abundance of fresh herbs!
Oven Drying
Looking for a quick and easy way to dry your herbs? Try using your oven! This method is perfect if you need to dry your herbs quickly or if you live in a humid climate. However, it’s important to note that oven drying can affect the quality of your herbs if not done properly.
To start, preheat your oven to the lowest temperature possible (usually around 140°F). Spread out your herbs on a baking sheet lined with parchment paper and place them in the oven. It’s important to keep an eye on them and check every few minutes because they can easily burn. Also, make sure to leave the door slightly cracked open to allow moisture to escape.
Once the herbs are crispy and crumbly, take them out of the oven and let them cool before storing in an airtight container.
One thing to keep in mind when using this method is oven maintenance. Be sure to clean any debris or residue from previous cooking sessions before drying your herbs. This will help prevent any unwanted flavors from transferring onto your herbs.
Additionally, be cautious not to overcrowd the baking sheet as this can impact airflow and cause uneven drying. If done correctly, oven drying can produce high-quality dried herbs that will preserve their flavor for months!
Using a Dehydrator
Now that we’ve covered oven drying, let’s talk about another method for preserving the flavor of summer herbs: using a dehydrator. While oven drying can be effective, a dehydrator offers some distinct advantages.
First and foremost, a dehydrator is specifically designed for the task at hand. This means that it will dry your herbs more evenly and efficiently than an oven could. Additionally, many dehydrators have adjustable temperature controls which allow you to customize the drying process based on the specific type of herb you’re working with.
Overall, using a dehydrator can save you time and produce higher quality dried herbs.
When using a dehydrator, there are some tips to keep in mind to ensure the best results. First, be sure to clean your herbs thoroughly before placing them in the machine. Any dirt or debris left on the leaves can affect their flavor and quality once they’re dried.
Additionally, make sure to spread out your herbs evenly on the trays so that they dry uniformly. Finally, don’t be afraid to experiment with different temperatures and drying times depending on the specific herb you’re working with – this will help you achieve optimal results every time!
Storing Your Dried Herbs
In order to keep your newly dried herbs fresh and flavorful, it’s important to store them properly. Did you know that improper storage can cause up to 50% of the flavor to be lost? Here are some storing techniques and preservation tips that I’ve found helpful:
-
Store in airtight containers: Use glass jars or resealable plastic bags with all the air squeezed out. This prevents moisture from getting in and causing mold or spoiling.
-
Keep away from heat and light: Store your herbs in a cool, dry place away from direct sunlight or heat sources such as stovetops or ovens. Heat exposure can cause the oils in your herbs to evaporate, leading to loss of flavor.
-
Label and date your containers: Be sure to label each container with the type of herb and date it was dried so you can keep track of freshness.
Most herbs will last up to one year if stored properly.
By following these simple steps, you can ensure that your hard work drying those summer herbs pays off with delicious flavors throughout the year!
Using Your Dried Herbs
Using dried herbs adds depth and complexity to your cooking, elevating even the simplest dishes with rich and nuanced flavors. But did you know that dried herbs can also be used for more than just cooking?
Infusing oils with dried herbs is a great way to add flavor to dressings, marinades, and sauces. Simply place a handful of your favorite herbs in a jar of oil, seal it tightly, and let it sit in a cool, dark place for a few weeks. The longer it sits, the stronger the flavor will be.
Dried herbs can also be used in seasoning blends for creative flavor combinations beyond traditional cooking. Mix together dried basil, garlic powder, onion powder, and salt for an Italian seasoning blend that can be sprinkled on popcorn or roasted vegetables. Or combine thyme, rosemary, oregano and black pepper for a savory poultry seasoning that works well on chicken or turkey.
With so many possibilities for using dried herbs beyond cooking, there’s no reason not to have a stash of them in your pantry all year round!
Conclusion
In conclusion, drying and storing fresh herbs is an excellent way to preserve the essence of summer. I’ve learned through my own experiences that choosing the right herbs to dry is crucial in achieving maximum flavor and aroma.
Once you’ve harvested and prepared your herbs, there are several methods you can use to dry them out, including air-drying, oven-drying, and using a dehydrator.
After drying your herbs, it’s important to store them properly in order to maintain their freshness. Whether you choose to store them whole or ground up into a powder, make sure they’re kept in an airtight container away from direct sunlight or moisture. With proper storage, your dried herbs can last for up to a year or more without losing their potency.
As the old adage goes, "the proof of the pudding is in the eating." So why not try using some of your freshly dried herbs in your next recipe? You might be surprised at how much more flavorful and aromatic they are compared to store-bought alternatives. Plus, knowing that these herbs came from your own garden and were lovingly preserved by you makes them all the more special.